Tag Archives: ionic framework tutorial for beginners
Ionic Colors
Ionic Colors : Ionic provides ready color utility which you can use frequently in you application. Ionic provides recommended naming convention for colors. It’s easy and simple to use ionic colors utility rather than adding the colors in css. You can also override the default colors. Here we are going to explain the color utility with example and demo.
Ionic Colors
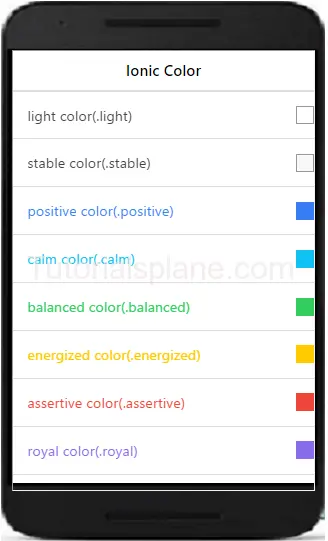
Here is list of colors available in ionic Colors-
Text Colors Class
If you want to change the text color add the below css-
- .dark
- .stable-dark
- .positive
- .calm
- .balanced
- .energized
- .assertive
- .royal
- .dark
Background Colors Class
If you want to change the background color add the below css-
- .dark-bg
- .stable-dark-bg
- .positive-bg
- .calm-bg
- .balanced-bg
- .energized-bg
- .assertive-bg
- .royal-bg
- .dark-bg
Here an example of both text and background color
Ionic Colors example with syntax
|
If you run the above example it will produce the following output-
Ionic Grid
Ionic Grid – Ionic provides beautiful grid system. It uses css flexible box and layout module so ionic supports all devices which supports layout module standard. Grid in ionic is basically 12 column layout system. You can add columns as per your requirement. Here we are going to explain the grid system in ionic.
Ionic Grid Example
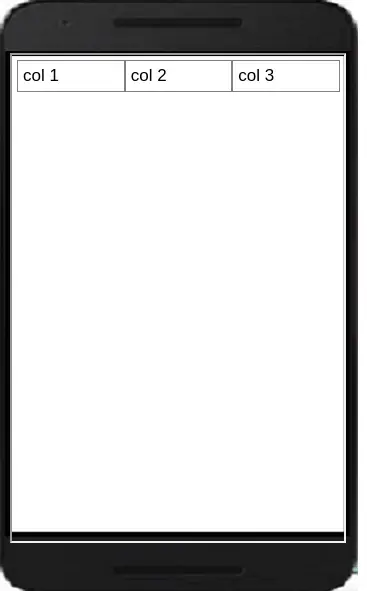
To create grid columns we first need to create row. Add class .row in div and add the child divs with class name .col. Add the .col class as much as you want to create columns. Below is simple example of grid with 3 columns.
If you run the above example it will produce output something like this –
More About Grid
Let us learn more about the grid system in ionic framework.
Explicit Column Sizes
You can explicitly define the column size for example sometimes we need
a specific column to be larger than the other columns in the same row. By default each column evenly takes the available area but for the specific size of the column ionic uses the percent system(12 column grid system).
By using this grid system you can make a column larger by just using the percentage and the others remaining columns will divide the remaining area. Let us create a simple example to understand the explicit column sizes.
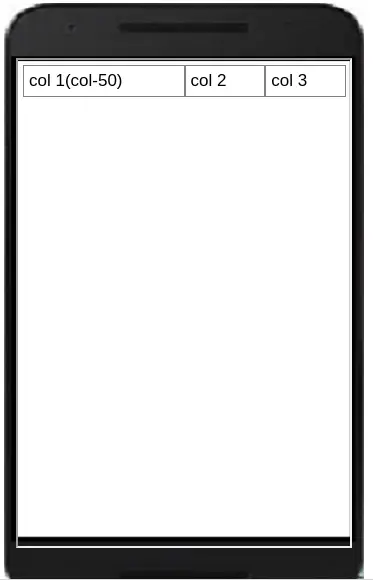
Example
In the above example first column will be 50% of the screen size and the rest columns will adjust accordingly. If you run the above example it will produce output something like this –
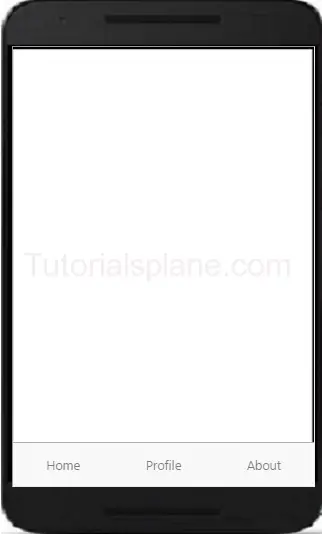
Ionic Tabs
Ionic Tabs : Tabs are basically used for navigation in mobile device. It can be placed on the top or bottom. It can contain the the links icons in top or bottom. Tabs are beautiful ways used for navigation in mobile devices. Here we are going to explain the ionic tabs with example and demo.
Syntax for Ionic Tabs
The class .tabs is used to create the tabs. Items in tab are added using the .tab class. Tab can be positioned at top or bottom of the screen.
The above example will give following output-
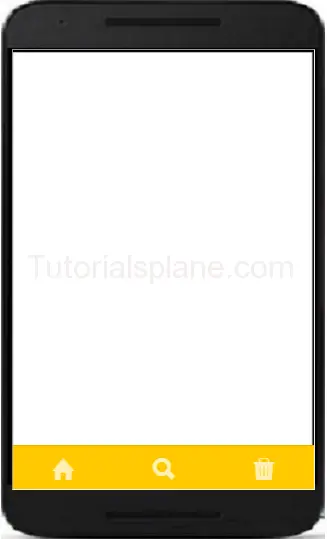
Ionic Tabs on Top of Screen
The class .tabs-icon-top is used to create the tabs on top of screen.
The above example will give following output-
Tabs with icons
You can add icons in ionic framework as below –
The above example will give following output-
![]()
Colored Tabs Example
You ca create colored tabs using the ionic color pattern. Here is list of colors available in ionic –
- tabs-default
- tabs-light
- tabs-stable
- tabs-positive
- tabs-calm
- tabs-balanced
- tabs-energized
- tabs-assertive
- tabs-royal
- tabs-dark
You Can use the above classes to add the color in Ionic Tabs-
The above example will give following output-
Get Mobile Number in Ionic Framework
Get Mobile Number in Ionic Framework : In ionic framework you can use the DeviceInformation plugin to get the information from device. Install the cordova plugin from – https://github.com/vliesaputra/DeviceInformationPlugin. Here we are going to explain the method to get information from device such as – Get phone number, SIM card serial number etc.
Get Mobile Number in Ionic Framework
Using the https://github.com/vliesaputra/DeviceInformationPlugin plugin you can get the following information –
- Your unique Device ID
- Phone Number (if it is stored in your SIM card)
- Country ISO of your phone network provider
- Network provider name
- SIM Card Serial number
- Country ISO of your SIM card
- Name of your SIM card mobile operator
- E-mail/Phone number used by apps listed in your Settings > Accounts & Sync list
Below is sample code to get device information to get the desired data from the result
Get Phone Number in Ionic Framework
var deviceInformation = cordova.require("cordova/plugin/DeviceInformation");
deviceInformation .get(function(result) {
        console.log("result = " + result);
    }, function() {
        console.log("error");
    });
|
The above example will give you the device information such as phone number.
Datepicker in ionic Framework
Datepicker in ionic Framework : Datepicker is common plugin which is used mostly in many applications. You can use Datepicker in ionic by adding cordova-plugin-datepicker available at – https://github.com/VitaliiBlagodir/cordova-plugin-datepicker. We are going to explain the steps to add datepicker in ionic framework.
Installing plugin for Datepicker in ionic Framework
Here are steps to install the datepicker cordova-plugin-datepicker –
First Install Datepicker from Ionic CLI
Install Datepicker from Ionic CLI
cordova plugin add cordova-plugin-datepicker |
Run the above command to install the plugin.
Create function to call datepicker –
Install Datepicker from Ionic CLI
 $scope.MyDatePicker = function($event) {
        var options = {
            date: new Date(),
            mode: 'date'
        };
        datePicker.show(options, function(date){
            if(date != 'Invalid Date') {
                console.log("Date came" + date);
            } else {
                console.log(date);
            }
        });
        $event.stopPropagation();
    };
|
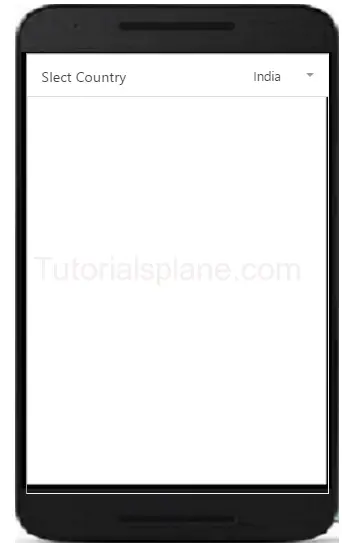
Ionic Select
Ionic Select – Select in Ionic Provides the functionality to select option from dropdown. It will work different than the traditional select box in the browser. We are going to explain the functionality of the select with example and demo.
Ionic Select
Now let us create very simple select box in ionic. First wrap the select box with label and add the classes – .item, .item-input and .item-select. Now add div with class .input-label inside the created label to create label. Now add html select <select> and their options in <option> tag.
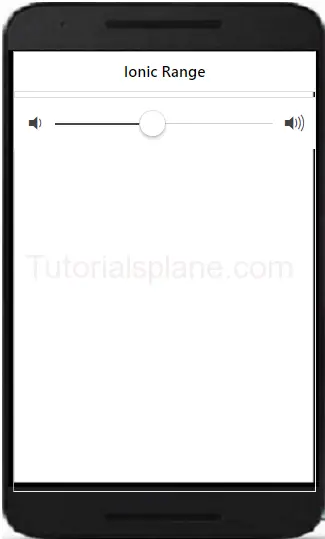
Ionic Range
Ionic Range Slider: Range Slider enables the user to select the range between the given points. Range slider provides disks to manage the range. There are various range selectors in Ionic which you can use in your application. It is very easy to customize the range slider. You can use classes to add the colors to the elements. We are going to explain the method how to use range sliders and how to customize them.
Ionic Range Slider Example | Color | Selector
Let us understand the Range selector with very basic example –
If you run the above example it will produce the output like this –
More Examples
Let us learn more abot the ionic range. Here we are going to explain how to add different colors and icons.
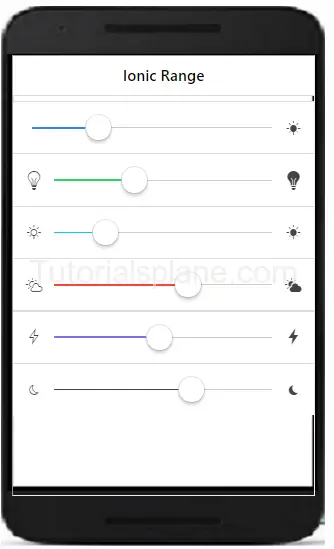
Ionic Range List With Different Colors And Icons
Here we are going to add different icons and colors in the range of ionic framework.
The above example will produce the following output-
Ionic Radio Button
Ionic Radio Button: Radio button are specially used to select one item from the given list. There is main difference between the radio buttons and checkbox – Checkbox allows you multiple selection of items in list while radio buttons allows you to select only one item in given list. We are going to explain the functionality of radio buttons in ionic framework.
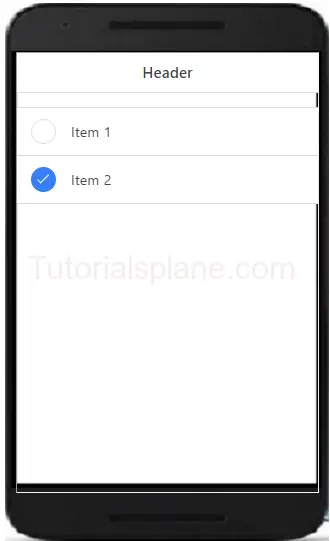
Ionic Radio Button
Here is an example of radio button in ionic –
After running the above example it will produce the following output as bellow-

Ionic Checkbox
Ionic Checkbox: Checkbox is basically used for selecting items from the set of choice. Ionic provides classes to create beautiful checkboxes. A label wrapper with class checkbox is used to wrap the input checkbox. It will represent both the selected and unselected checkboxes in beautiful design. We are going to explain the ionic Checkboxes with example and online demo.
Ionic Checkbox Example
Here is simple example of ionic checkbox with shows both states of checkbox.
The above example produce the following output as below-
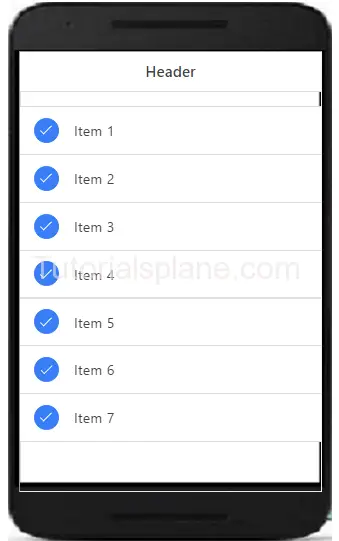
Ionic Multiple Checkboxes
You can create multiple checkboxes in ionic. The li class .item-checkbox is used to create multiple checkboxes in ionic framwork.
The above example produce the following output as below-
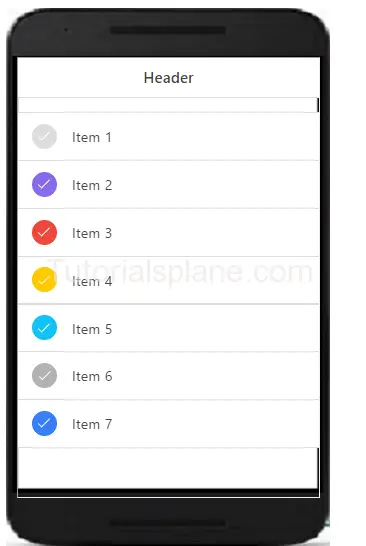
Ionic Colored Checkbox
You can add colors to the ionic checkboxes using color classes available in ionic to create colored Checkboxes-
The above example produce the following output as below-