Ionic 2 Action Sheet
Ionic 2 Action Sheet: Action Sheet is dialog that allows users to choose option from the set of options. Action Sheet is placed at the bottom of the screen and it is placed at the top of the app’s content, As it is placed on the top of the content so it needs to be dismissed before interaction the app content. Here in this tutorial we are going to explain how To create Ionic 2 Action Sheet. You can also use our online tool to see the output of the example.
Ionic 2 Action Sheet Example
Action Sheet is basically created using an array of buttons and these buttons have several properties such as Text, Handler, Role, Icon etc which can be used easily to add Text, Icons etc.
ActionSheet.create(opts) Method is used to create the Action Sheet in Ionic 2 Where you can pass all the options in first Argument. Let us create a very basic Action Sheet example –
- 1. HTML Part – It contains the Html Part.
- 2. Script Part – This contains typescript code for the actionsheet.
Now let us go one by one to understand the Action Sheets –
Html Part : demo.html
Html Part Contains the a button which calls the function openMenu() on click event. This is the template where you want to add the action sheet button.
Ionic 2 Action sheet Example: Html Part
<ion-content padding>
  <h2>Action Sheets</h2>
  <button ion-button block (click)="openMenu()">
    Show Action Sheet
  </button>
</ion-content>
|
Html part contains the Layout of the page and we have created a button “Show Action Sheet” and we have called a function openMenu() to show menu, this function is defined in JavaScript Typescript – demo.ts file.
Script Part : demo.ts
Script Part contains the required resources to create Action Sheet, It contains the openMenu() function which is triggered on Button click to open the Action Sheet.
MatIonic 2 Action sheet Example: Script Part
import { Component } from '@angular/core';
import {ActionSheetController} from 'ionic-angular';

@Component({
  selector: 'demo-page',
  templateUrl: 'demo.html'
})
export class DemoPage {

  constructor(public actShtCtr: ActionSheetController) {

  }

  openMenu() {
    let actionSheet = this.actShtCtr.create({
      title: 'My Action Sheet',
      cssClass: 'action-sheets-basic-page',
      buttons: [
        {
          text: 'Destructive',
          role: 'destructive',
          handler: () => {
            console.log('Destructive clicked');
          }
        },{
          text: 'Archive',
          handler: () => {
            console.log('Archive clicked');
          }
        },{
          text: 'Cancel',
          role: 'cancel',
          handler: () => {
            console.log('Cancel clicked');
          }
    }
      ]
    });
    actionSheet.present();
  }
}
|
Import ActionSheetController, add in constructor as above and call create() method with parameters. The main things required to use the ActionSheet is below-
1. importing ActionSheetController.
2. calling it in constructor.
Thus using the both steps you can create action sheet anywhere.
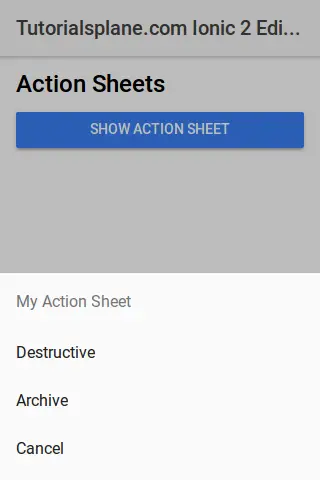
If you run the above example it will produce output something like this-
Download Demo
To download demo files click here – Download Ionic 2 Actionsheet
If you unzip the downloaded file, it contains folders Used to created the above demo-
- folder app
- folder pages
Options Available:
Instance Method
create(opts) |
- opts(ActionSheetOptions)– Action Sheet Options are title, subtitle and array of buttons. There are basically following two types of options accepted by create method-
- 1. ActionSheet Create Options
- 2. ActionSheet Button Options
1. ActionSheet Create Options
Following ActionSheet Create Options Are Available –
| Option | Type | Description |
|---|---|---|
| title | string | This is used to Add title Action Sheet. |
| subTitle | string | This is used to Add sub-title for the Action Sheet. |
| cssClass | string | This is used to Add Additional classes for custom styles, You can add multiple classes separated by space. |
| enableBackdropDismiss | boolean | If the Action Sheet should close when the user taps the backdrop. |
| buttons | array | An array of buttons which will be displayed on Action Sheet. |
2. ActionSheet Button Options
Following options for button are provided which can be used easily –
| Option | Type | Description |
|---|---|---|
| text | string | Button text. |
| icon | icon | Button Icon |
| handler | Any | An express the button should evaluate |
| cssClass | string | Add Additional Classes separated by space. |
| role | string | How the button should be displayed, destructive or cancel |
Learn More
Let us Learn More About Ionic 2 Action Sheet.
Ionic 2 ActionSheet With SubTitle | ICON | Css Class
Action sheet With Icons | Subtitle | Custom Css Example: Script Part
import { Component } from '@angular/core';
import { Platform, ActionSheetController} from 'ionic-angular';

@Component({
  selector: 'demo-page',
  templateUrl: 'demo.html'
})
export class DemoPage {
  constructor(public platform: Platform, public actShtCtr: ActionSheetController,public atrCtrl: AlertController) {

  }


  openMenu() {
    let actionSheet = this.actShtCtr.create({
      title: 'My Action Sheet',
      subTitle: ' Demo Subtile ',
      cssClass: 'action-sheets-basic-page',
      buttons: [
        {
          text: 'Destructive',
          role: 'destructive',
          icon: !this.platform.is('ios') ? 'trash' : null,
          cssClass:'yellow-color',
          handler: () => {
            console.log('Destructive clicked');
          }
        },{
          text: 'Archive',
          icon: !this.platform.is('ios') ? 'share' : null,
          cssClass:'blue-color',
          handler: () => {
            console.log('Archive clicked');
          }
        },{
          text: 'Cancel',
          role: 'cancel',
          icon: !this.platform.is('ios') ? 'close' : null,
          cssClass:'red-color',
          handler: () => {
            console.log('Cancel clicked');
          }
    }
      ]
    });
    actionSheet.present();
  }
}
|
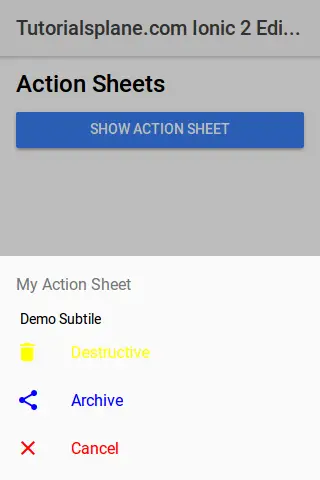
If you run the above it will add custom color using custom css class and we have also added icons to the buttons. The output of the above example will be something like this-
Advertisements
Add Comment
📖 Read More
- 1. Ionic 2 Alerts
- 2. Ionic 2 Badges
- 3. Ionic 2 Buttons
- 4. Ionic 2 Cards
- 5. Ionic 2 Checkbox
- 6. Ionic 2 DateTime
- 7. Ionic 2 Fabs
- 8. Ionic 2 Grid
- 9. Ionic 2 Inputs
- 10. Ionic 2 Lists


