Category Archives: Jquery Blog
last-child Selector- jQuery
$( “:last-child” ) – selector is used to select the last child of its parent.
Syntax : last-child Selector- jQuery
first-child Selector- jQuery
$( “:first-child” ) – selector is used to select the first child of its parent.
Syntax : first-child Selector using jQuery
Class Selector jQuery Example
$(“.class”) – selector is used to select the elements in the page which have class “.class”.
Class Selector jQuery Example – $(“.class”)
$(this) Selector in jQuery
$(this) – selector is used to select the current element in the page.
Syntax : $(this) Selector in jQuery
All Selector – select all elements in a page- jQuery
All Selector (*) selects all the elements of the page.
All Selector – select all elements in a page with jQuery(*) Syntax
All Selector – select all elements in a page- jQuery Example
|
How to get current date in javascript
How to get current date in javascript :
You get current date in javascript using the Date() function which returns the current date as per your timestamp.
Displaying Dates In Javascript :
Using .toUTCstring() It converts date in UTC String(a standard format to date display)
Using .toDatestring() It converts date in user friendly date format.
Facebook style cover image reposition in php jquery
Facebook style cover image reposition in php jquery : In this post we are going to explain the functionality implemented just like facbook style cover image repostion in php and jquery.
Jquery Ui : Jquery ui is used to enable the draggable functionality for the selected image.
Php : We are using php on sever side to resize and crop the image on co-ordinates provided. Co-ordinates are passed to the server selected by the user.
Jquery Ui Draggable : Provides the draggable functionality on element. Event is triggered when we move mouse on the
element ie image in this case.
Jquery Function used for draggable functionality.
Facebook style cover image in PHP with Syntax
Jquery Ui : Draggable
function initUi(){


    $(function(){
    $(".coverimage").css('cursor','s-resize');
    var y1 = $('.imagecontainer').height();
    var y2 = $('.coverimage').height();
    $(".coverimage").draggable({
       scroll: false,
       axis: "y",
       drag: function(event, ui) {
             if(ui.position.top >= 0)
             {

               ui.position.top = 0;

              }
              else if(ui.position.top <= y1 - y2)
              {
               ui.position.top = y1 - y2;

               }

            },
            stop: function(event, ui) {
            //####
            $("#top").val(ui.position.top);

        }
        });
});
 }
|
Main page with above code and main layout : index.php
Javascript Code to handle the drag and save event.
|
PHP Code On Server Side : functions.php
Php code to Resize And Crop the image to Fit on container
 $h) {
      $imageHeight = floor(($h/$w)*$width);
      $imageWidth  = $width;
    } else {
      $imageWidth  = floor(($w/$h)*$height);
      $imageHeight = $height;
    }
    $x = 0;

  $new = imagecreatetruecolor($imageWidth, $imageHeight);
  // preserve transparency
  if($type == "gif" or $type == "png"){
    imagecolortransparent($new, imagecolorallocatealpha($new, 0, 0, 0, 127));
    imagealphablending($new, false);
    imagesavealpha($new, true);
  }
  imagecopyresampled($new, $img, 0, 0, $x, 0, $imageWidth, $imageHeight, $w, $h);
  switch($type){
    case 'bmp': imagewbmp($new, $dst); break;
    case 'gif': imagegif($new, $dst); break;
    case 'jpg': imagejpeg($new, $dst); break;
    case 'png': imagepng($new, $dst); break;
  }
  return true;
}
function crop($source,$destination,$destinationWidth,$destinationHeight,$x1,$y1){
     if(!list($w, $h) = getimagesize($source)) return "Unsupported picture type!";
     $type = strtolower(substr(strrchr($source,"."),1));
      if($type == 'jpeg') $type = 'jpg';
      switch($type){
        case 'bmp': $copy = imagecreatefromwbmp($source); break;
        case 'gif': $copy = imagecreatefromgif($source); break;
        case 'jpg': $copy = imagecreatefromjpeg($source); break;
        case 'png': $copy = imagecreatefrompng($source); break;
        default : return "Unsupported picture type!";
      }
      // this is taken because of maintaining the aspect ratio for the croping to the exact height and width.
      $w = $destinationWidth;
      $h = $destinationHeight;
      $new = imagecreatetruecolor($destinationWidth, $destinationHeight);
      imagecopyresampled($new, $copy, 0, 0, $x1, $y1, $destinationWidth, $destinationHeight, $w, $h);
       switch($type){
        case 'bmp': imagewbmp($new, $destination); break;
        case 'gif': imagegif($new, $destination); break;
        case 'jpg': imagejpeg($new, $destination); break;
        case 'png': imagepng($new, $destination); break;
      }
    return true;
}
?>
|
Main crop.php handling the complete server process :
Jquery ui autocomplete not working with bootstrap
Jquery ui autocomplete not working with bootstrap : This occurs basically due to z-index conflict. It is fixed easily by increasing the z-index of the input field. Sometimes when you are working with jquery ui auto complete and bootstrap there may be z-index problem which hides the jquery ui autocomplete result. This issue can be fixed by adding the z-index to the ui result. Make sure the ui autocomplete has higher z-index than the others on the page.
Jquery ui autocomplete not working with bootstrap
Now lets Add the following css to fix the issue.
Add Z-index in ui-autocomplete css
.ui-autocomplete {
    position: absolute;
    z-index: 1000;
    top: 0;
    left: 0;
    cursor: default;
    background-color: #fff;
    padding:3px;
    border: 1px solid #ccc
}

.ui-autocomplete > li.ui-state-focus {
  background-color: #FF6C00;
}
|
In the above example we have added two css onefor z-index and second for adding background color. To fix the overlapping issue ad the z-index:1000*(maximum to keep on top as per my need) it can be higher or lesser in your case. So check your design and z-index of others.
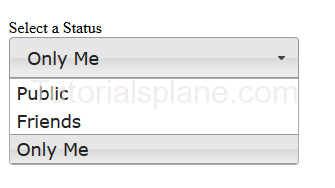
Facebook style select box
Facebook style select box
Facebook Style Select box using Jquery ui.
It provides stylish select dropdown menu. It provides the functionality of the select drop down like facebook select
box.
Preview :

Facebook Style Select dropdown menu
Following Jquery and Css are Required for the functionality.
Add the following Jquery and css in the header of the page.
Demo syntax for Facebook style select box
Example
<!doctype html>
<html lang="en">
<head>
<meta charset="utf-8">
<meta name="viewport" content="width=device-width, initial-scale=1">
<title>Facebook Style Jquery Select Dropdown Demo</title>
<link rel="stylesheet" href="//code.jquery.com/ui/1.11.4/themes/smoothness/jquery-ui.css">
<script src="//code.jquery.com/jquery-1.10.2.js"></script>
<script src="//code.jquery.com/ui/1.11.4/jquery-ui.js"></script>
<link rel="stylesheet" href="/resources/demos/style.css">
<script>
$(function() {
$( "#status" ).selectmenu();
});
</script>
<style>
fieldset {
border: 0;
}
label {
display: block;
margin: 35px 0 0 0;
}
select {
width: 290px;
}
.overflow {
height: 290px;
}
</style>
</head>
<body><div class="main-demo">

<form action="#">

<fieldset>
<label for="speed">Select a Status</label>
<select name="status" id="status">
<option selected="selected">Public</option>
<option>Friends</option>
<option>Only Me</option>
</select>
</form>

</div>

</body>
</html>


